...a dream is a wish your heart makes...
Once upon a time I awoke early in the morning, washed my face, brushed my teeth, (didn't brush my hair), put a bit of moisturizer and mascara on my face and eyes, put my work clothes and glasses on and was out the door. This is the tragedy of that everyday routine:

Yikes! What a nightmare! Hard to believe I go my day-to-day life looking like such a mess.
The fact of the matter is, we don't all have time to make ourselves look like movie stars everyday. Heck, even movie stars don't look like movie stars everyday, they look like this:

And this is one of the sexiest women in the world, Sofía Vergara!
She probably doesn't look even remotely recognizable to her usual self because not only does she not have her hair all vamped up and makeup professionally painted on but she also doesn't have THE perfect lighting reflecting off her face like she does when we usually see her onscreen.
I guess the moral of the story is that we can't all look perfect all the time. Even makeup artists don't always wear all that makeup. So I am going to show you how I transform myself from the "everyday look" to the sophisticated date night look...my Cinderella transformation!
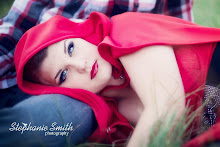
Fyi this look was my makeup/outfit for my Valentines Day dinner date, but it can work for any evening out.

Here is the finished hair/makeup. I did a low side-swept up-do for my hair which was super simple. It was actually an attempt at hair tutorial, which I will post the link to below.
As for the makeup, here are most of the products that I used:

As always, my Coastal Scents 88 Color Palette. This thing is ah-mazing! I recommend every lady pick one of these up, they're less than $20 bucks and are very good quality for the price. For this look I was using colors from the pink row, the second lightest pink shade.


Here are most of the products that I used to achieve this look:
- Cover FX cream foundation
- Tarte Smooth Operator finishing powder
- EOS lip balm
- Lorac eye primer
- Clinique's eyeshadow/blush set in Strawberry Fudge
- Sephora shimmery white eyeshadow
- Bare Minerals eye shadow in Wearable Medium Brown
- Maybelline Stiletto liquid eyeliner in black
- Sephora Nano eyeliner in White
- La Cross eyelash curler
- Lancome Definicils Mascara in black
- Bare Minerals lip gloss in Citrus Tart (I believe)
- Lastly...the lashes:

These are false lashes purchased from Forever 21 (yes, and they are rather decent lashes) for around $2.50 a pair. Good deal, huh? Obviously, these lashes were meant for someone with quite large eyes ( I have the opposite) so it is best to trim them down to size. However, I altered these lashes by making them into my own demi-lashes because I feel like my eyes appear a bit to, how do you put it...hookerish...when I have a full strip of dramatic thick lashes on. This is solely due to the fact that my eyes are so minuscule that the lashes take over and you can no longer see any of my lids (I am by no means suggesting that people with "normal" sized eyes look hookerish with a full strip of lashes).

So, what I did was trim these lashes exactly in half and after I curled my lashes and applied a coat of mascara but before I applied liquid eyeliner I applied the outer part of each lash to the respective eye it belonged on (being either the right or left eye). Now, what did I do with the other half of each lash, you ask? Well, I applied them (upside down so the hairs go in the same direction as the natural ones do) to the bottom lash line. I did this to open my eyes up more and create a dramatic doll like effect. It's a lot of fun, especially if you're looking to try something different and experiment with false lashes. You glue them the same way you would the top lashes by squeezing a dot of glue onto the back of your hand and then running the lash strip across this to apply a small bead of glue to the false lash. Wait a minute before applying so the glue is a tad bit tacky and then ease the lash up under your lower natural lashes (making sure that the false lash is upside down, opposite of how you apply them on your top lashes). Since I was using the remaining half of each strip make sure that, like the top lash, the longest part of the false is at the outer corner of your eye.

And here is the finished look of the false lashes! Notice the doll-like effect from applying false lashes on both top and bottom. Yeah, that's never gunna happen with mascara with the natural wimpy lashes I have on the bottom. I know my explanation on how to achieve this effect was long winded but I definitely recommend trying it out for yourself sometime!

This overall look is actually very easy.
- Clinique moisturizer all over
- Apply lip balm to lips
- Cover FX foundation all over face ( I actually apply it with clean fingers, it's very manageable this way and the heat from your hands warms the foundation making the application very smooth and you don't have to worry about cleaning a brush :) Although, using a regular 'ole foundation brush works just fine.
- Tarte Finishing Powder all over
- Lorac eye primer on the lids
- Use a light pink color on the outer corner of each eye. Work it in and a bit above the crease and bringing this color towards the middle of the lid.
- Take a white shimmery shadow and fill in all areas where the pink doesn't cover, so bring it from the inner corner into the middle of the lid. Also bring it up from the inner corner to the brow bone.
- Take a light brown color (I used the lighter brown shade from the Clinique Strawberry Fudge set) and with a fluffy blending brush sweep it into the outer corner of the lid, defining that crease. Blend this on top of that pink so the colors flow nicely together. Don't go too heavy on the brown, this is intended to be a subtle romantic look, especially since we're using heavy lashes.
- With a small fine brush sweep some of the shimmery white shadow under the lower lash line from the inner corner towards the middle of the lash line. Also do this with a dark brown color from the outer corner in towards the middle so the two colors meet.
- Line the water line of your lower lash line with a white eyeliner (such as the Sephora Nano eyeliner). I also used this white eyeliner in the outer corner of my eye (that little crack between wear the upper and lower lashes meet), to open them up more, and blended it so it looked very subtle
- Curl and apply mascara to lashes
- Apply false eyelashes (explained above)
- With a black liquid eyeliner, line the upper lash line. Wing-out this line so that it comes out a bit further than where your outer lash line ends. It's best to do this after you apply the false lashes because then you can go over where they meet your eyelid to take care of any visible gaps or glue.
- Define your eyebrows (I use an angled brush with a light/medium brown eyeshadow from my 88 Color Palette).
- Contour the facial features. Use a contour brush (Crown Brushes has some great ones) and a dark brown color (this is what I used the Bare Mineral Wearable Medium Brown shadow for) to contour the cheek bones, shading this so your cheeks look more defined. This makes your face appear thinner.
- Highlight the facial features. I used the same shimmery white eyeshadow again and with my finger tip blended it on the bridge of my nose, center of my forehead right above where the eyebrows meet, the high points of my cheeks, and right above my upper lip (makes lips look fuller).
- Apply blush to apples of the cheeks. Blend pink colors from the Clinique Straberry Fudge set together for a glow-ey rosy color.
- Lastly, I used a nude/gold lip gloss by Bare Minerals, but any nude or light pink color would look great on the lips. I wouldn't use too bold of a color though, considering the eyes are rather bold.
Whew! That was a mouthful...hope you all made it through that! Even if you skipped over the directions and have found yourself here, at least you're still reading. Kudos to us all. So, for the hair, since I am a fan of Michelle Phan, I followed her video tutorial for the romantic updo. Click here to see video. P.s. another one of her video tutorials was the inspiration for the eyes that I did for this look as well (I had watched both videos that day and then made my adaptions when I was getting ready for my date that night). Therefore, if you didn't feel like reading my directions above following her makeup tutorial would result in a very similar look, minus the bottom lashes.

I had 10 minutes to do my hair so I really rushed through this process and it still came out rather lovely.

It's hard to take a picture of the back of your head yourself :P
And to throw some fashion in here, to finish the makeover on myself here is my wardrobe change:

Before: my usual work wear.

After: little black dress with black tights, black pumps, and some gold bangles. I know, lots of black, but it is winter still, isn't it?
So, that is how I dress myself up! I hope you all enjoyed my little Cinderella adventure and also enjoyed seeing the power of some makeup and a curling iron. Being a woman ain't so bad, after all, we do have the ability to transform ourselves with a pair of false lashes and some heels. Maybe we can't look like the sexiest woman on Earth everyday, but neither does the sexiest woman on Earth!
Looks SO good Rachel! I love the look, & that updo! So gorgeous, especially on you :)
ReplyDeletethank you liz! the hair was really super easy, I'm usually deficient when it comes to my hair but I breezed through this.
ReplyDelete