Thursday, February 17, 2011

My Cinderella Story

...a dream is a wish your heart makes...

Once upon a time I awoke early in the morning, washed my face, brushed my teeth, (didn't brush my hair), put a bit of moisturizer and mascara on my face and eyes, put my work clothes and glasses on and was out the door. This is the tragedy of that everyday routine:
Yikes! What a nightmare! Hard to believe I go my day-to-day life looking like such a mess.

The fact of the matter is, we don't all have time to make ourselves look like movie stars everyday. Heck, even movie stars don't look like movie stars everyday, they look like this:
And this is one of the sexiest women in the world, SofĂ­a Vergara!

She probably doesn't look even remotely recognizable to her usual self because not only does she not have her hair all vamped up and makeup professionally painted on but she also doesn't have THE perfect lighting reflecting off her face like she does when we usually see her onscreen.
I guess the moral of the story is that we can't all look perfect all the time. Even makeup artists don't always wear all that makeup. So I am going to show you how I transform myself from the "everyday look" to the sophisticated date night look...my Cinderella transformation!
Fyi this look was my makeup/outfit for my Valentines Day dinner date, but it can work for any evening out.
Here is the finished hair/makeup. I did a low side-swept up-do for my hair which was super simple. It was actually an attempt at hair tutorial, which I will post the link to below.

As for the makeup, here are most of the products that I used:
 As always, my Coastal Scents 88 Color Palette. This thing is ah-mazing! I recommend every lady pick one of these up, they're less than $20 bucks and are very good quality for the price. For this look I was using colors from the pink row, the second lightest pink shade.


 Here are most of the products that I used to achieve this look:
          •  Cover FX cream foundation
          • Tarte Smooth Operator finishing powder
          • EOS lip balm
          • Lorac eye primer
          • Clinique's eyeshadow/blush set in Strawberry Fudge
          • Sephora shimmery white  eyeshadow
          • Bare Minerals eye shadow in Wearable Medium Brown
          • Maybelline Stiletto liquid eyeliner in black
          • Sephora Nano eyeliner in White
          • La Cross eyelash curler
          • Lancome Definicils Mascara in black
          • Bare Minerals lip gloss in Citrus Tart (I believe)
          • Lastly...the lashes:
 
These are false lashes purchased from Forever 21 (yes, and they are rather decent lashes) for around $2.50 a pair. Good deal, huh? Obviously, these lashes were meant for someone with quite large eyes ( I have the opposite) so it is best to trim them down to size. However, I altered these lashes by making them into my own demi-lashes because I feel like my eyes appear a bit to, how do you put it...hookerish...when I have a full strip of dramatic thick lashes on. This is solely due to the fact that my eyes are so minuscule that the lashes take over and you can no longer see any of my lids (I am by no means suggesting that people with "normal" sized eyes look hookerish with a full strip of lashes). 
 So, what I did was trim these lashes exactly in half and after I curled my lashes and applied a coat of mascara but before I applied liquid eyeliner I applied the outer part of each lash to the respective eye it belonged on (being either the right or left eye). Now, what did I do with the other half of each lash, you ask? Well, I applied them (upside down so the hairs go in the same direction as the natural ones do) to the bottom lash line. I did this to open my eyes up more and create a dramatic doll like effect. It's a lot of fun, especially if you're looking to try something different and experiment with false lashes. You glue them the same way you would the top lashes by squeezing a dot of glue onto the back of your hand and then running the lash strip across this to apply a small bead of glue to the false lash. Wait a minute before applying  so the glue is a tad bit tacky and then ease the lash up under your lower natural lashes (making sure that the false lash is upside down, opposite of how you apply them on your top lashes). Since I was using the remaining half of each strip make sure that, like the top lash, the longest part of the false is at the outer corner of your eye.

And here is the finished look of the false lashes! Notice the doll-like effect from applying false lashes on both top and bottom. Yeah, that's never gunna happen with mascara with the natural wimpy lashes I have on the bottom. I know my explanation on how to achieve this effect was long winded but I definitely recommend trying it out for yourself sometime!

This overall look is actually very easy.
  1. Clinique moisturizer all over
  2. Apply lip balm to lips
  3. Cover FX foundation all over face ( I actually apply it with clean fingers, it's very manageable this way and the heat from your hands warms the foundation making the application very smooth and you don't have to worry about cleaning a brush :) Although, using a regular 'ole foundation brush works just fine.
  4. Tarte Finishing Powder all over
  5. Lorac eye primer on the lids
  6. Use a light pink color on the outer corner of each eye. Work it in and a bit above the crease and bringing this color towards the middle of the lid.
  7. Take a white shimmery shadow and fill in all areas where the pink doesn't cover, so bring it from the inner corner into the middle of the lid. Also bring it up from the inner corner to the brow bone.
  8. Take a light brown color (I used the lighter brown shade from the Clinique Strawberry Fudge set) and with a fluffy blending brush sweep it into the outer corner of the lid, defining that crease. Blend this on top of that pink so the colors flow nicely together. Don't go too heavy on the brown, this is intended to be a subtle romantic look, especially since we're using heavy lashes.
  9. With a small fine brush sweep some of the shimmery white shadow under the lower lash line from the inner corner towards the middle of the lash line. Also do this with a dark brown color from the outer corner in towards the middle so the  two colors meet.
  10. Line the water line of your lower lash line with a white eyeliner (such as the Sephora Nano eyeliner). I also used this white eyeliner in the outer corner of my eye (that little crack between wear the upper and lower lashes meet), to open them up more, and blended it so it looked very subtle
  11. Curl and apply mascara to lashes
  12. Apply false eyelashes (explained above)
  13. With a black liquid eyeliner, line the upper lash line. Wing-out this line so that it comes out a bit further than where your outer lash line ends. It's best to do this after you apply the false lashes because then you can go over where they meet your eyelid to take care of any visible gaps or glue.
  14. Define your eyebrows (I use an angled brush with a light/medium brown eyeshadow from my 88 Color Palette).
  15. Contour the facial features. Use a contour brush (Crown Brushes has some great ones) and a dark brown color (this is what I used the Bare Mineral Wearable Medium Brown shadow for) to contour the cheek bones, shading this so your cheeks look more defined. This makes your face appear thinner.
  16. Highlight the facial features. I used the same shimmery white eyeshadow again and with my finger tip blended it on the bridge of my nose, center of my forehead right above where the eyebrows meet, the high points of my cheeks, and right above my upper lip (makes lips look fuller).
  17. Apply blush to apples of the cheeks. Blend pink colors from the Clinique Straberry Fudge set  together for a glow-ey rosy color.
  18. Lastly, I used a nude/gold lip gloss by Bare Minerals, but any nude or light pink color would look great on the lips. I wouldn't use too bold of a color though, considering the eyes are rather bold.

Whew! That was a mouthful...hope you all made it through that! Even if you skipped over the directions and have found yourself here, at least you're still reading. Kudos to us all. So, for the hair, since I am a fan of Michelle Phan, I followed her video tutorial for the romantic updo. Click here to see video. P.s. another one of her video tutorials was the inspiration for the eyes that I did for this look as well (I had watched both videos that day and then made my adaptions when I was getting ready for my date that night). Therefore, if you didn't feel like reading my directions above following her makeup tutorial would result in a very similar look, minus the bottom lashes.
I had 10 minutes to do my hair so I really rushed through this process and it still came out rather lovely.
It's hard to take a picture of the back of your head yourself  :P
And to throw some fashion in here, to finish the makeover on myself here is my wardrobe change:
Before: my usual work wear.
After: little black dress with black tights, black pumps, and some gold bangles. I know, lots of black, but it is winter still, isn't it? 

So, that is how I dress myself up! I hope you all enjoyed my little Cinderella adventure and also enjoyed seeing the power of some makeup and a curling iron. Being a woman ain't so bad, after all, we do have the ability to transform ourselves with a pair of false lashes and some heels.  Maybe we can't look like the sexiest woman on Earth everyday, but neither does the sexiest woman on Earth!
♥Rae

Friday, February 11, 2011

The Necklace to End All Necklaces

Well my friends, by popular demand I present to you the greatest necklace of all time...my Betsey Johnson elephante necklace. I received this stunning piece as a gift from my mother for loving me as much as she does. She purchased it off ebay for 1/4 of the price than I'm sure it cost and gifted me with it's glory. This is no ordinary necklace it was purged from the depths of the...ha ha I could go on about this gaudy piece and keep us all in suspense but I don't want to come off idolizing it too much or anything since it is an image of a large animal with horns and all...so without further ado, here it is:


Seriously though, I get more comments on this piece of jewelry than anything else I've ever owned, from both women AND men. This came as a surprise because it's quite large and colorful and just outright out there, but people LOVE it for some reason. I'm not quite sure what it is about this necklace, but every time I wear it, without fail, I get multiple comments. I feel like it's a rather bold piece, so the popularity of my elephant makes me think that maybe everyone should make some bold statements of their own once in awhile...we all seem to like it on me, why not you?

I love Betsey Johnson for many reasons, first being that she is bold so I think we can all take some tips from her and her boldness (not in the hair department, however. :/ Sorry, I may not like to brush mine everyday either but that look just ain't workin'). SO I thought it would be fun to give some examples of some Betsey pieces, animal inspired, that could really spice up a rather dull outfit. I'm not sayin' go out and buy these exact pieces because, like my elephant necklace, some of her older stuff may be near impossible to find. BUT I would like us all to be inspired by the Betsey-ness.

 These funky monkeys would be a wild way to make any outfit more fun.

Love, love, love this elephant ring!

 Leopard. nough said.

Let this slither it's way into your style.

This dragonfly would look very elegant as a brooch or necklace.

Leopard attack!!!!!!! Please please please never wear pieces like this all together...I see that far too often than it should ever happen, especially since I work in a place where I'm in contact with a lot of retired women.

OMG I need this elephant bracelet!!!

I have this spidey bracelet. It's the closest I'll ever get to a spider and it gives a very elegant, gothic, kinda feel.

I think we all get the jist of it and I need to hurry and end this post so that I can go stalk down where to buy that elephant bracelet :P We could all use a little wildness in our wardrobe every once in awhile. A necklace, bracelet, earrings, or even a brooch similar to any of these may seem a little bold for your style but trust me when I say you're not going to be gawked at for wearing something unique. My elephant necklace experience is evidence enough that the masses will enjoy your willingness to be a little out there.

xo Rae

Saturday, January 29, 2011

Fashion-fluence

This post is dedicated to my fashionable niece, Sadie. Now, I must forewarn everyone that Sadie is the cutest little girl you will ever see in your life so don't be jealous of me :) I could definitely post 800,000 pictures of all the adorable outfits my sister-in-law, Stephanie, has put Sadie in but to spare everyone from too much of my gushing I've chosen the outfits that I have chosen for Sadie (if you would like to see more of Sadie visit Steph's blog at www.sadieandsawyer.com).

These first pictures are my animal-print influence on Sadie when she was about 3 months old.
It just so happened that day when I went over to visit Sadie that I was wearing leopard print TOO! Who woulda thought?! I guess it's not that surprising, animal print most likely makes an appearance once a week on me.
What a cutie!
Here's another outfit I got her that we decided to put on and snap some photos while we were all in the leopard mood...although, I'm always in the leopard mood!
Here is Sadie at almost 2-years-old in an adorable shirt that I got her for Christmas. She's such a great model! I remember sporting similar scotty-dog shirts, skirts, hair bows, ect when I was young too so when I saw this in Target I had to get it for her.
Sadie is wearing the red ruby slippers that I got her on Christmas, SO adorable! Honestly, I wish they made those in my size, I would still wear them :) ...actually now that I think about it, the grown up version of those would be some hot red sparkly pumps...I'll have to put those on my to-do list.

That's all for now of Sadie. I'm sure she'll make an appearance more as a little fashionista on my blog. Especially now that she's getting older and able to make choices of her own, she's a smart little one so I imagine she will put together some great outfits herself.

xo Rae

Friday, January 14, 2011

Pink Friday!

It's a pink day today with my new special edition Pink Friday Mac lipstick by Nicki Minaj. Seen here is Nicki Minaj's latest album cover titled "Pink Friday" where, conveniently enough, she models her own perfectly pink lipstick she designed with Mac.
A few months ago this lip color went on sale on Mac's website only for Black Friday (makes sense now, huh?). Mac sold out of this hot color very quickly (something like before 11AM) so luckily they made it available for purchase every Friday for the 4 weeks after Thanksgiving. Since it was so limited I knew I had to have one of my own.  And here is my Pink Friday on this beautiful Friday afternoon:
The color is a very fun matte bubblegum pink. I must say it's not a lipstick for everyday wear, but it is HOT. It's so vibrant that it's almost cartoonish so I felt the need to tone it down with a tinted lip gloss, as seen below.
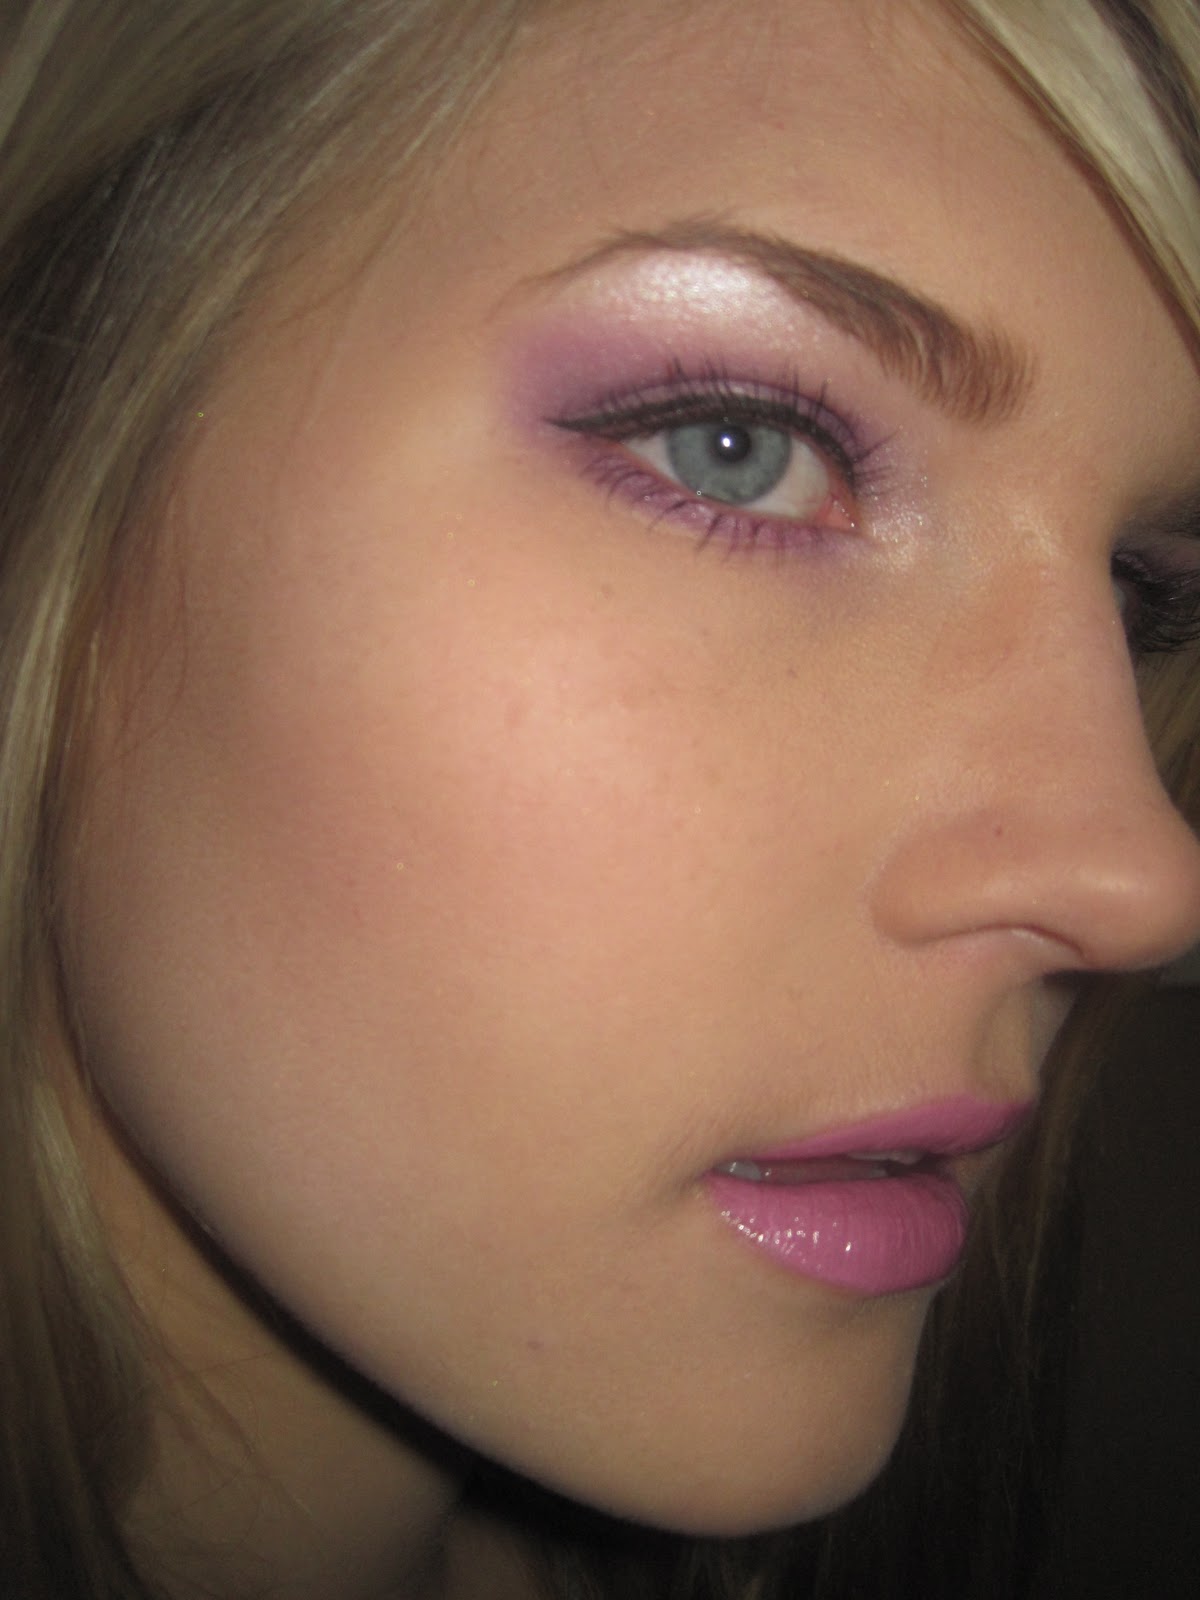
I also did a fun purple eye with this lip color that was inspired by the Barbie's of my childhood like such:
Barbie always had fun bright colored eyeshadow in blue, pink, purple, ect, that girl had some style! I seemed to remember this morning a particular pink clad doll with purple done up eyes that inspired me at my makeup vanity when thinking about my new Pink Friday lipstick. So here's to you Barbie!
I hope you enjoyed this very pink post and all have a happy Friday and fabulous weekend!

Saturday, January 8, 2011

New Year and New Things!

Welcome to 2011 all! I don't know about your plans but I plan for this year to be a HUGE year for me. It's been a bit of a rough first week for me filled with stressful life related things but I've spent the weekend relaxing and re-prioritizing in order to accomplish my ultimate goals, i.e. makeup.
SO, what's new? Firstly, I would like to introduce these little babies (caution, please ignore my gross cankles, yeah I know it's the new year, I will be getting on the workouts asap):

Please welcome my newest addition, the Ironstone Suede Air Zelo Cole Haan ballet flats! Wow. That was quite a mouthful, which is well deserved for all these have to offer (not to mention the arm and leg they cost). Essentially, they are adorably cute ballet flats that are stylish with any outfit, casual or dressy, PLUS they offer Nike Air support making them the WORLD'S MOST COMFORTABLE *CUTE* SHOES! I decided to make the investment since I begain working in retail (all of 1 week ago) because after my first day of working in unsupportive flats I came home and shed tears over my tattered feet for hours. These shoes have definitely changed my feet(s) lives and they will forever yearn for more Cole Haan to comfort them.

Next new item on the agenda is my semi-new eye gear. Today was a beautiful and bright day so I sported these lovely Betsy Johnson sunglasses that my mom got me a few months ago.
She always seems to be able to find great deals on my favorite Betsy Johnson gems and these were an ultimate find! There's a really unique floral pattern on the sides which adds to all my reasons to love them. I also wore my Betsy Johnson elephante necklace that seems to be popular among the masses because it's one of my most complimented jewelry items. Unfortunately, it was cold and windy out so it's hiding under my jacket but I will have to post a picture of it soon for all to marvel at it's glory.

Last but most certainly not least is my new business cards! May I present the result of my mother and I's hard work...
My mom is not only wonderful but extremely talented in all things computers. Over Christmas we designed these from my mental picture. I love them because they're unique AND original AND bedazzled due to my free time today. We put a lot of work into these and I feel they rightfully represent me and my business so they will definitely be doing their job well.

Well that's all for today, new shoes, new shades, and a new business. No big deal. Just a day in the life :)

Monday, December 27, 2010

Happy Holidays from my new blog!

So this is my first official blog post. The only type of blogging I have done up until now is Livejournal in the early 2000's, if that even counts as "blogging." I have been wanting to start a fashion/makeup blog for some time now and it took unemployment/graduating from college to free up my time enough to be able to actually do it. My plans for this blog are to frequently update the world with my regular fashion ideas along with my daily makeup looks and what I'm in to. I hope that I will have at least a few readers who have a love for these things along with myself and will enjoy my life as much as I do :)
So, onto the more important matters...what has my makeup been up to over the holidays?! Well, I experimented with several looks, a few of which can be seen in this little collage I put together:
My love this season has been the plumb and gold combo. I really worked these colors in various looks from a colorful cateye to a well blended smokey eye seen above. I also had a lot of fun with blending silver and white with a bit of gold on the outer V along with lining the waterline of my eyes with white eyeliner. Here's the completed look (although taken on my iPhone so not the best quality image):
I also had some fun with a few shades of lipstick. I used a Rimmel bubblegum pink color all over and this really awesome hot pink Mac color on the outer edges of my lips to create a depthiness that I will definitely be repeating.
Last but not least, my Christmas look! I wore this red and green sensation on Christmas day and it was eye catching enough for even my dad to compliment it! Red eyeshadow is not commonly used but I figured what better time to attempt red?! I used red as the base and smoked it out with a deep green. I actually tried this look last week and failed to blend the green enough so it did'nt look too hot. Blending is key here or else it will just look like a hot green mess (which it did on my first attempt).

I hope you all (which will probably only be my sister at this point..shout out to my B!) enjoyed this first post and will continue reading because I think we can have a fun thing going here :)